Q: I want to submit an entry, but don’t understand some of the elements that are being requested. What do I do?
A: Let’s go through each section one block at a time. The first section is just supplying your name and email address. Both are important in case we have questions and need to contact you. Fill in as shown here:

The next section is Saw Type and contains two types. One is for hand saw and the other is for back saw. Hand saws generally have blades from 16-30″ and back saws typically have blades from 8-30″. The biggest difference is that a back saw has a heavy steel or brass back that grips the blade. Please note we are not interested in two or one man cross cuts saws of the type used to fell trees. They are outside the scope of the book. Select which one applies to you as shown here:

Next is a section on Tooth Profile. There are two choices, Cross Cut and Rip. Cross Cut teeth generally have 12-15 degrees of rake and also have fleam filed in the teeth. Rip teeth generally have 0-8 degrees of rake and are filed straight across with no fleam, Use the diagram below to pick which one applies to you and select the proper choice from the drop down:


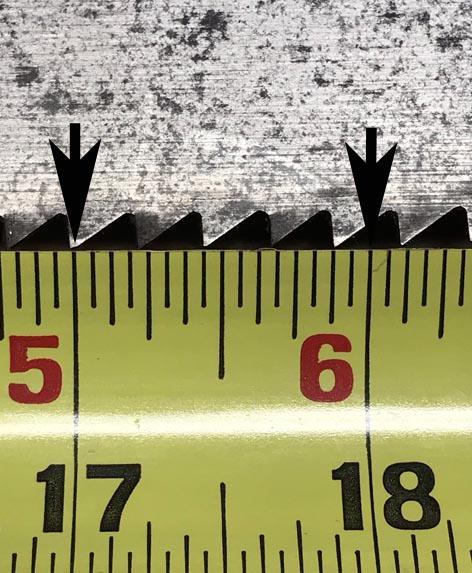
The next section is Tooth Pitch. This describes the number of points in one inch. There are two conflicting standards which confuse many people. Teeth per inch (TPI) is the number of full teeth in one inch. Tooth Pitch is the number that Saw Makers used in describing their saws. In the picture below, you can see how to measure this number. 90% of the time, the pitch is stamped on the blade directly below the handle. To measure the pitch if this is not the case, line up a ruler or tape so the inch marks line up with two different points and just count the number on and between the two lines. In the first example below, the correct number is 10. Adjust the slider to reflect the correct number.
You will note that there are half sizes. Rip teeth were often cut in half sizes. If you line up the ruler and the inch falls on a gullet and not a point, then count the number of full points and add one half. 5 1/2 was a very popular size for rip saws

The next section is Blade Length. Simply measure the length of the blade and record the number to the nearest inch. Almost all saws were made in 2″ increments. You might find one which has been cut down and is an oddball length. Measure along the toothline as shown and type in the correct measurement in inches. The blade below is 20″


Next is the section for the Maker Name. You will find this on up to 3 places. The first is the blade where it will often be etched. It may take some cleaning to see it. If it is a back saw, it is also typically stamped into the spine. Finally, if it is one of the larger makers, it will also be marked on the main saw medallion. It’s possible that if it is a back saw, it might have all three. In the example shown, it is only marked on the blade via the etch. Many times the etch will be very hard to read. Supply what you can make out.

The next section is Model Number. This is typically found in the etch. There may not be one present. If there is none shown, put none.

Next is Maker Location and is almost always found in the etch or stamped into the spine. It might also be located on the medallion. Type it in the box shown as shown:

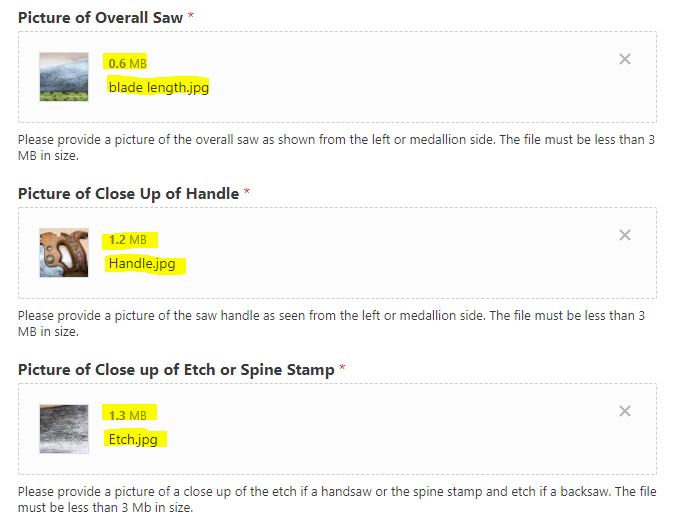
Finally is a section to upload pictures of the saw overall, the etch or spine area and a close up of the handle. We’ve constructed this form with the idea you could do all the inputs on your smartphone. If you do, select the medium image size or one that puts each image size below 3 MB. If you do it on your desktop, consider cropping the image to reduce the file size. Each picture should fill the screen and be in focus so we can refer to it if needed. To upload the image, just click inside the box, select the image location and click upload. If you get an error message, the image is too large. Reduce the image size and try again. When complete, there will be an image in each section:

Lastly, there is a General Comments area to supply any additional information that you feel might be pertinent.
When complete, hit the Submit button to send your information to us. If we have questions, we will be in touch via email.

If successful, you should see the following message. To enter a second saw, simply reset the form by hitting the refresh button on your web browser.

Q: I don’t have a copy of the book, how do I know if the saw is not already listed?
A: Write us through the general contact form with the name of the maker and ask and we will let you know. You can also just complete the form and we will use it if it is not listed.
Q: When will the book be published?
A: We hope to have the project completed by the end of 2020. Look for an announcement here for a presale offering.

